
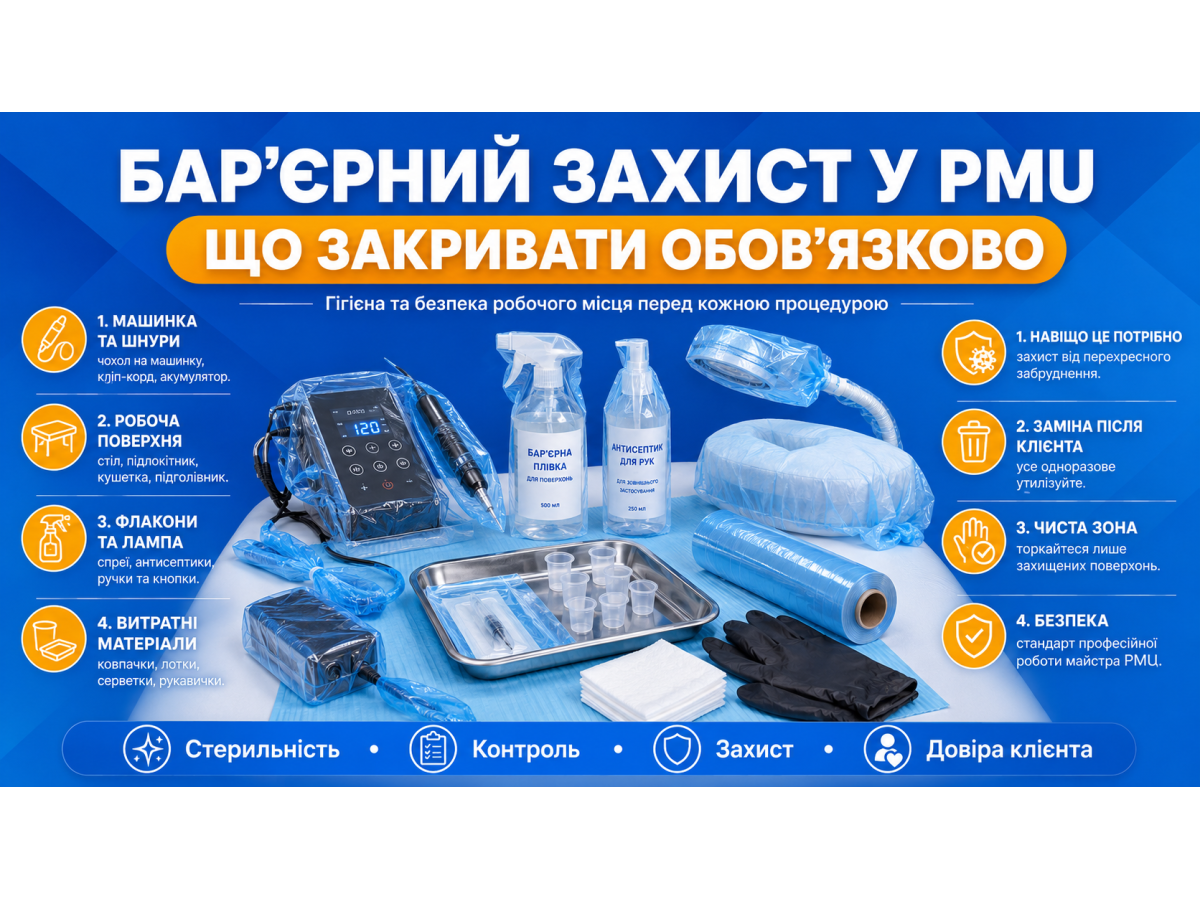
During a procedure, the artist works close to broken skin, pigment, lymph, microdroplets of biological fluids, wipes, the cartridge, the machine, and gloves. Even when everything looks neat, contamination can spread through touch.
The artist touches the client’s skin, then the machine, then the lamp, then the pigment bottle or the power supply button. That is why it is important not only to “clean up after the procedure,” but to cover in advance everything the artist will touch during work.
In PMU, the logic is simple: anything touched by gloves during the procedure or anything that may become contaminated with pigment and biological material should be disposable, covered with a barrier, or cleaned and disinfected after the client.
What is barrier protection?
Barrier protection is a disposable cover that creates a physical barrier between contamination and a surface. These may include sleeves, bags, covers, film, adhesive barrier sheets, disposable pads, medical films, protective covers for the machine, cord, lamp, treatment bed, table, and other items.
A barrier does not sterilize the surface and does not replace disinfection. Its purpose is to prevent contamination from reaching areas that are difficult to clean completely. After the procedure, the barrier is removed and discarded, and the surface is checked.
If the surface has become contaminated or the barrier was damaged, it must be cleaned and disinfected. It is important to understand that barrier protection works only when it is used correctly.
If the artist covers the machine but touches an uncovered power supply, phone, or pigment bottle with contaminated gloves during the procedure, the chain of cleanliness is already broken.
What must be covered
First of all, everything in the “working touch zone” should be covered. This is not only the machine. Artists often think that putting a sleeve on the device and placing a disposable sheet on the treatment bed is enough. In reality, the artist touches many more objects during the procedure.
The following should be covered:
- the permanent makeup machine;
- the cord, clip cord, or charging/working cable if used;
- the holder or grip if it is not disposable;
- the power supply or control panel;
- the pedal if the artist uses one;
- the lamp and adjustment handles;
- the work table or tray;
- the surface where the machine is placed;
- the treatment bed, headrest, and area around the client’s face;
- bottles the artist may take during the procedure;
- the anesthetic bottle if it is used during work;
- containers, organizers, or stands touched by gloves;
- the phone or camera if they are used during the procedure.
The machine: the main barrier-protected item
The machine is the item the artist holds throughout the entire procedure. That is why it should always be covered. Even if the housing is easy to wipe, the machine has seams, buttons, connectors, textured elements, and connection points with the grip or battery.
All of these are harder to process than a flat table surface. Disposable bags, sleeves, or covers are used for the machine. They should cover the housing so the glove does not touch uncovered areas.
If the machine is wireless, it is important not to block ventilation openings if the design includes them. If the machine is wired, both the housing and the cord must be protected.
After the procedure, the cover should be removed carefully by turning the contaminated side inward. It should not be pulled off sharply in a way that allows pigment drops to reach the housing or work table.
Cord, clip cord, and cables
Cords are often underestimated. They can touch the table, treatment bed, the artist’s clothing, apron, gloves, and work surfaces. If the cord is not covered, it can easily become a carrier of contamination.
Long disposable sleeves or bags are used for cables. They are placed before the procedure begins, before contact with the client. The barrier should cover the part of the cord located in the working area or the part that may touch contaminated surfaces.
If the artist uses a wireless machine, this does not mean barriers are no longer needed. The focus simply shifts to the machine body, battery unit, buttons, and surfaces the artist touches during the process.
Power supply, pedal, and buttons
The power supply, control panel, voltage buttons, and mode buttons are typical “touch points.” During the procedure, the artist may change settings, increase or decrease speed, or turn the device on and off. If these elements are not covered, they become contaminated by gloves.
The power supply is best covered with adhesive barrier film or a disposable bag so the artist can still see the screen and control the settings. The pedal, if used, should also be covered or placed in a way that allows it to be safely processed after the procedure.
Lamp and adjustment handles
The lamp is another risk area. The artist may change its position during the procedure, tilt it, raise it, or move it closer to the brows, lips, or eyelids. If the lamp handles are not covered, they become contact surfaces.
The parts of the lamp that the artist actually touches should be covered: handles, switches, touch buttons, brightness controls, and the stand in the touch zone. Barrier film or disposable covers are convenient for this.
It is not necessary to wrap the entire lamp completely. Barrier protection should be logical: cover the areas that may become contaminated during the procedure.
Work table, tray, and machine stand
The work surface is where pigment cups, wipes, cotton swabs, cartridges, anesthetic, the machine, or the machine stand are placed. That is why the table or tray should either be covered with a disposable cover or thoroughly disinfected before and after the procedure.
The machine stand should also be protected or easy to process. The machine should not be placed directly on the table, even if the table looks clean. During work, the table may have microdroplets of pigment, wipe residue, glove contact, and contact with used materials.
A good practice is to divide the surface into a “clean” zone and a “working” zone. The clean zone holds unopened materials, extra wipes, and additional cartridges in packaging. The working zone contains only what is used during the procedure.
Treatment bed, pillow, and client area
The treatment bed should be covered with a disposable sheet or drape. The headrest and the area around the client’s face require special attention because this is where the artist works closest to the skin, pigment, and wipes.
If a pillow, bolster, or reusable headrest is used, it must be covered with a disposable cover. After the client, the cover is discarded, and the surface is processed according to the studio protocol.
Fabric blankets, decorative pillows, or reusable covers should not be used in the procedure area if they cannot be processed after every client. In PMU, the beauty of the room should never be more important than hygiene.
Pigment bottles, anesthetic, and auxiliary products
Bottles are often left without protection because the artist thinks, “I will only add a drop of pigment.” But if color needs to be added during the procedure, another shade is needed, or anesthetic is used again, the bottle may become contaminated by gloves.
Ideally, the necessary pigments should be prepared before the procedure: dispensed into disposable pigment cups and removed from the working area. If a bottle must remain nearby, it can be covered with barrier film or handled only with clean gloves.
The bottle nozzle should not touch the pigment cup, skin, gloves, or wipes. Leftover pigment from the cup must never be returned to the bottle.
The same applies to anesthetic, thinners, aftercare products, and other materials. Anything that may come into contact with gloves during the procedure should be disposable, covered, or processed after the client.
Phone, camera, and photos during the procedure
The phone is one of the most common mistakes in the treatment room. The artist takes a “before” photo, then works, then picks up the phone with contaminated gloves to take an intermediate photo or turn on music. After that, the phone becomes a carrier of contamination.
If a phone or camera is needed during the procedure, it should be covered with barrier film or used only after gloves are changed. Ideally, photos should be taken before the procedure, the phone should be put away, and final photos should be taken after the work is finished, gloves are removed, and hand hygiene is performed.
The phone should not lie on the work table next to cartridges, pigment cups, and wipes.
What does not have to be covered but must be cleaned
Not every surface needs to be wrapped in film. For example, floors, walls, closed cabinets, and decorative items outside the working area are not direct contact surfaces of the procedure. However, if a surface is close to the workstation, it still needs regular cleaning.
In PMU, the main focus should be on what the artist touches during the procedure and what is located in the immediate working area.
How to remove barrier protection correctly
Removing a barrier requires as much attention as applying it. After the procedure, the outer side of the film is considered contaminated. It should not be touched with clean hands, placed on the table, or shaken.
The correct sequence is:
- Dispose of the cartridge in a sharps container.
- Remove the most contaminated disposable materials.
- Carefully remove barriers by turning the contaminated side inward.
- Discard barriers into the appropriate waste container.
- Remove gloves.
- Perform hand hygiene.
- Put on clean gloves.
- Clean and disinfect surfaces if needed.
If pigment, liquid, or signs of contamination are found under the barrier, the surface must be cleaned and disinfected. A barrier reduces risk, but it does not cancel the need to check.
Common mistakes artists make
The first mistake is covering only the machine. In reality, contamination is often transferred through the lamp, power supply, bottles, phone, and work table.
The second mistake is reusing the same barrier. Barrier protection is always disposable. It cannot be “wiped and left for one more client.”
The third mistake is touching clean materials with contaminated gloves. If the artist opens a cabinet, takes a new cartridge, or reaches for a bottle during the procedure, hand and zone cleanliness must be controlled.
The fourth mistake is not changing gloves after removing barriers. The outer side of the film is contaminated, so after removing it, it is better to move to the clean stage with new gloves.
The fifth mistake is covering surfaces chaotically. The barrier should match the real route of the artist’s hands. If you know that during the procedure you touch the lamp, power supply, table, and anesthetic, these exact zones should be protected.
Minimum checklist before the procedure
Before starting work, check that:
- the machine is covered;
- the cord or battery area is protected;
- the power supply or control panel is covered;
- the lamp and adjustment handles are protected;
- the treatment bed and headrest are covered;
- the work table or tray is prepared;
- the machine stand is protected or disinfected;
- pigment cups are disposable;
- pigment bottles are not in the dirty zone;
- the phone is removed or covered;
- there is a sharps container;
- there are extra gloves for changes during the procedure.
This checklist takes less than a minute, but helps prevent most common violations.
Conclusion
Barrier protection in PMU is not a small detail, but a part of professional safety. It is needed for everything the artist touches during the procedure or anything that may become contaminated with pigment, lymph, blood, or gloves.
The machine, cord, power supply, lamp, work surface, treatment bed, headrest, machine stand, and all items the artist handles during work should be covered. Phone, bottles, anesthetic, and auxiliary products also require control: either a barrier, clean gloves, or processing after the procedure.
The main idea is simple: anything that is difficult to clean properly or is often touched by gloves is better covered with a disposable barrier. After every client, barriers are removed and discarded, while surfaces are checked and disinfected if needed.
A professional artist cares not only about a beautiful result, but also about a safe process. These details build client trust, studio reputation, and the quality of PMU work.